Zoeken in deze blog

dinsdag 29 mei 2012

Pizza from scratch


A few days ago my sister asked me when we would eat Swiss cheese fondue again. I don't like it a lot, but she's doing her exams this month, so no question of hers can be denied I guess. I went for the fondue at the supermarket - I've never prepared it myself, so the shop's will do for the time being.

For myself - not a fan of the bread in cheese combination - I decided to make my own pizza from scratch. 

Knowing my own habits of messing around, I made the dough and the tomato sauce this morning before taking a shower (so that my hair wouldn't be white from flour again). 

Ingredients for a 1 person's pizza dough:
- 85 ml luke warm water
- 1 teaspoon salt
- 2/3 tablespoon honey
- 1 tablespoon olive oil (I used scented oil with bay leaves and peppers)
- 116 grams flour
- 2 to 3 grams instant yeast

How to:
Mix the water, yeast and honey and leave them for a couple of minutes.
Then add the flour to form a sticky dough. Add the salt when all the other ingredients have been mixed thoroughly. It'll look somewhat like this:


Knead for a little while and make a ball of it which you put in a small bowl covered in the olive oil. Cover the bowl with a towel/tin foil/... until it has risen. As I made it early in the morning and the pizza was meant for tonight, I set it in the fridge. 


Ingredients for the tomato sauce:
(enough for 3 pizza's - put the rest in the freezer if not needed)
- 1 can of peeled tomatoes (400 grams)
- 1 little can of tomato paste (70 grams)
- 2 cloves of garlic
- 1 tablespoon basil
- 1 tablespoon oregano
- 1 teaspoon salt
- 1/2 teaspoon black pepper
- 2 teaspoons sugar

How to:
Heat the peeled tomatoes, the tomato paste and the mashed garlic cloves until they cook. Add the herbs, sugar, salt and pepper and let simmer on low heat for at least 20 minutes.


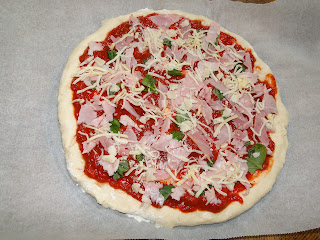
I'm quite fond of my toppings. I think I've not quite often chosen different ones the last couple of years. They're nearly always tomato sauce, cooked ham, parmesan cheese, fresh basil leaves and a little gruyere. You might say it's like pizza prosciutto, but my version.


After assembling the pizza, it was ready to be put in the oven (230°C) for about 20 minutes. I usually depend on my instincts and take it out when I think it should. The crust must be light golden brown in colour and must sound hollow when tapped.

I dare say it's been a really good dinner. I watched my sister and parents eat their cheese fondue and I enjoyed my pizza in the meanwhile :)

Believe me, this pizza tastes much better than it's freezer counterparts!


maandag 28 mei 2012

Home made vlaai

Ever heard about 'vlaai'? It's a very special kind of Flemish dessert. Many different recipes occur, and some of them are protected - including having secret ingredients and recipes - but my mum has her own.


It's always made out of milk, speculoos (a light brown biscuit made with different spices) and peperkoek (a kind of breakfast cake with yet again many spices) and syrup. My mum also adds raisins for taste and from time to time we also add coconut macaroons (a delicious biscuit made almost entirely out of grated coconut).


peperkoek
speculoos
candy syrup

As you see, this really is a regional dessert, with all these native ingredients.


The recipe here is my mum's. In Belgium all bakeries and town have their own, so I'm not claiming the truth about vlaai.  But it's worth trying, simply because it's so good and incredibly simple to make. You really can't do wrong in any way!

Ingredients:
- 1 l milk
- 1/2 pack of peperkoek (about 250 grams)
- 100 grams speculoos
- a few spoonfuls of candy syrup
- raisins as many as you want (if you like)
- coconut macaroons to taste


How to:
Put all the ingredients (except the raisins) in a large pot and crush them with a potato masher until you get a kind of brownish liquid. You really have to make sure there are a few lumps left, it sounds not very good but it's essential for the texture. 
Butter an oven tray or an aluminium baking tray. Pour the mixture in and scatter some raisins on top. Push these down with a fork so that they won't burn in the oven. 
Put the tray in a 180°C oven for 45 minutes. Take the vlaai out of the oven and let it cool. 


When first taken out of the oven, it tends to be still a bit wet. But it sets after cooling down.
It's also best eaten a while after baking. The taste gets more intense. 
We usually make it the night before or early in the morning. During hot days like these I put it in the fridge for extra coolness and it sets more easily too.


For serving, you just cut out a square piece. No fuss at all :)


Smakelijk!

zaterdag 26 mei 2012

Summer is in town!

Finally! After a very long time - a dreadful Summer in 2011 which couldn't be distinguished from Autumn, a long Winter and a wet, wet Spring - we finally made it into Summer.


This week temperatures rose up to 30°C, and it made me really happy. I think I'm not made for cold Winter days. I'm always shuddering, having cold hands and feet and drinking hot chocolate to warm myself. 


But I wasn't careful: I took my book (Emma by Jane Austen - a very good book by the way!) and sat myself in our garden. Of course I wasn't covered with sunscreen and happily read on and on. Result of it all is a lobster-look, red and fiery. In my yellow top I look really flashy. Now, I know it's not good so today I'm wiser and I've done my duty of having sunscreen and some more clothes on.


Anyway, apart from the annoying stingy feeling of a sunburn, Summer is just great.


Yesterday I went to dine out in Antwerp. I had a coupon of Flair magazine, with which I and a friend could dine out for a little amount of money. We had a wonderful time there. We sat by the Schelde and watching the sunset by the water.


Tonight we're at a barbecue of my parents' friends. I just love those nights on which every guest brings some part of the food or drinks to the place of venue. We're bringing some salads and the drinks. 
I decided to make a cold pasta pesto with pine nuts and tomato-mozzarella. 


Ingredients for tomato-mozzarella:
- 200 grams mozzarella
- good quality olive oil (I used basil scented olive oil)
- 3 large tomatoes
- oregano and basil to taste
- fresh leaves of basil/mint


How to:
Slice the mozzarella in fine, 1/4 cm slices. Cover them with some olive oil and the herbs. Let stand for a while so that the cheese can take up all the flavours. Slice the tomatoes in equally thin slices. Arrange the tomatoes and the cheese so that they alternate. Drizzle some more olive oil over it all and grind a little pepper or salt if you like. Decorate it with some nice fresh leaves of basil or mint.


What could you wish for more?


dinsdag 22 mei 2012

Pleasing dad ...


Yesterday I was making chocolate sprits (tuiles viennoises), but my dad was disappointed when he found out they contained chocolate. He's the only one in the house not liking chocolate. In fact, he only likes white chocolate, the kind that doesn't even contain a speck of cocoa! 


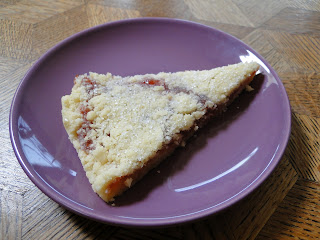
To please him, I made shortbread filled with strawberry jam. 


Ingredients:
- 180 grams flour
- 1 spoonful of lemon juice
- 60 grams sugar
- 120 grams butter
- strawberry jam to taste
- 1 spoonful of sugar 


How to:
Mix the butter and the sugar until all the lumps of butter have blended in the sugar. Add the juice and the flour and mix well. You'll get a powdery mixture, but that's normal. If you can squeeze a little ball with your hands of the mixture, you've the right substance.
Layer a round baking tray with non-stick paper. Squeeze half of the powdery mixture down until you get a layer of dough of a few millimetres. 
Then spoon the strawberry jam over the layer of dough. Spread it out so that the whole surface is covered. You can put as much as you want, according to your taste.
Cover, with the rest of the shortbread mixture, the jam and press all off it a little down so that the surface is flat.
Sprinkle a little sugar over the shortbread before baking.
Put the tray in a pre-heated oven of 180°C for about 25 to 30 minutes.


I really had to add a little heat and I even put the grill on so that the dough would get a little colour. The oven here isn't the best, so I'm obliged to work with it with a little trial and error.


The result: 


He's not home yet, so I'm patiently awaiting his reaction ...

maandag 21 mei 2012

Tuiles Viennoises by an amateur

Woken up too early for a day like this, no work or school duties to think about. My only tast today is do the groceries and the shops are not open at 7 am. What to do, then? 


I can't keep myself from messing around in the kitchen on moments like this. I took a look in my cooking library and decided to make peanut butter biscuits. 
Problem was that there wasn't any peanut butter in the house. That's so me - not checking at first what's needed and just starting off. 


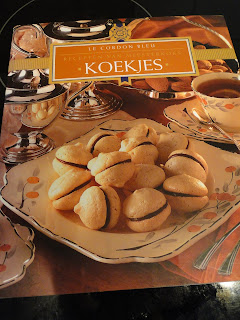
As I'd already started mixing the butter and sugar, I had to change plans quickly. I was looking in a cooking book of Le Cordon Bleu, the famous international culinary school. Luckily the book mentioned also a recipe of chocolate sprits or tuiles viennoises.


Ingredients for 10-12 sprits:
- 120 grams butter
- 50 grams white sugar
- 1 egg
- 175 grams flour
- vanilla essence
- 100 grams chocolate

How to:
Mix the butter with the sugar. Add the egg and the vanilla essence. When they've been mixed through, you can add the flour. The dough should be really smooth. 

I set off and mixed all the ingredients just like prescribed, that's not hard. 
Then came the next obstacle on my road to baking sprits: sprits need to be squeezed from a pastry bag on the baking tray. That's quite difficult for me, having no parstry bag in the house. But with a plastic bag and scissors, you can do it just fine. I put all of the dough in the bag and cut a small hole in one of the corners. You don't have these fancy shapes like with a professional pastry bag, but yeah ... the taste won't change, right?


I just needed to bake them in a 200°C oven (preheated) for about ten minutes and they were ready. They were slightly golden. The shape was not al all the one I'd intended of course. I blame the plastic bag!


Now, sprits have this chocolate dipped end, but I decided to turn the biscuits around so that their flat side was up, and I covered these with the molten chocolate.


They are not as fancy as the ones you see in the books, but taste matters :)

Bon appétit! 


vrijdag 18 mei 2012

Typical Belgian meatballs: frikadellen met kriekjes


I'm born and raised in Belgium. Belgian cuisine is really nice and mostly quite easy to prepare.
One of the things I really like is the following dish: meatballs with cherries. It's served with bread at my house. 
It may seem a strange combination, having warm (!) cherries as side dish with it, but in my country it's a traditional meal, and one of my personal favourites.


Ingredients for 4 people:
- 800 grams minced pork or a combination of minced pork and beef

- 2 eggs
- a dash of breadcrumbs
- pepper and salt

- nutmeg
- butter
- large bowl of conserved (sour) cherries
- 3 tablespoons of sugar
- 1 tablespoon of cornstarch
- bread (we prefer French bread)


Preparing the meatballs is the hardest part of the job - so I can tell you that the difficulty level isn't that high. 
Combine the minced meat, the eggs, breadcrumbs (as much needed to get a firm mixture). Add salt, pepper and a little nutmeg to taste. Form meatballs. The size really doesn't matter. Some people make them small, others form one large meatloaf. We make them mostly the size of a mandarin. Melt some butter in a pan and bake the meatballs slowly on low heat. 


To prepare the cherries, you pour the preserved cherries with all their juice and the sugar in a pot and put them on the stove to cook. Once they cook, you add some cornstarch (dissolved in a little water) to thicken the juice. Taste before you put them off the stove. Maybe it requires a little more sugar.


You're ready to serve! The thing with this kind of meal is that it's really a sociable meal. The pan with meatballs and the warm cherries are put in the middle of the table for everyone to grab as they like. The bread is cut into large chunks and dipped into the cherry sauce. Nothing fancy about it, but really tasty.


Smakelijk! 


Baking something like buchteln

At home we have this book called 'International Dishes' (in Dutch 'Internationale Gerechten') for years. It's a book full of recipes of all over the world. It's quite old, having been my mom's for decades. Russia doesn't exist in the book for example, the countries Yugoslavia and the USSR on the other hand are present. For me, born in the year 1990, it's a souvenir from an age I haven't experienced myself.


The book wants to teach us the art of cooking of all sorts of countries around the world, by presenting you with some specialties from each of them. I might say that the authors haven't always taught their readers the correct recipes. I as a Belgian can say that the signature dish from Ghent presented in the book (Gentse Waterzooi - a kind of soupy dish including potatoes, chicken, carrotys and leeks) looks quite alien to me.


Anyway, the book is great. It's been the book I've used the most often too. 


One of the first things I learned to make from the book was an Austrian recipe: 'buchteln'. It's a kind of brioche-like bread, scented with lemon zest. It's a wonderfully delicate taste. It's good enough to eat just like that, warm from the oven, but I tend to spread some good jam on top of it.


When I made it for the first time, I must have been about 13 or 14 years old. And since that time, my mum loves it.


Here's the recipe as mentioned in the book:


Ingredients: 
- 500 grams plain flour
- 30 grams fresh yeast (or 7 grams dried yeast)
- 50 grams white sugar (I used sugar infused with vanilla pods the last time)
- 1/4 l luke warm milk
- 40 grams butter (I used only 25 grams and it was great already)
- 2 eggs
- 1 1/2 teaspoon salt
- grated zest of 1 lemon
- 75 grams butter for baking
- powdered sugar for serving


How to:
In a bowl, make a heap of flour. Make a little pit in the middle in which you can mix the yeast, a little sugar, a little milk and a little flour. Leave it for about 15 minutes so that the yeast can start working.
Melt the butter and pour it in the bowl. Add the rest of the sugar, salt, milk, the whisked eggs and the grated lemon zest. Knead it all together until you get an elastic dough. It's quite sticky, but that's normal.

Leave the dough to rise for another 15-20 minutes.


Preheat the oven up to 220°C. Melt the 75 grams of butter on low heat. In the mean time, make little balls of dough of + 50 grams each. Roll them in the melted butter and place them one next to the other in a baking dish.
Bake the buchteln for about 20-30 minutes in the oven. 

Before serving, sprinkle with the powdered sugar.


As you might have seen in the pictures, I'm not the kind of cook to follow a recipe from A to Z. I can say that I ALWAYS do something else than mentioned. Because I feel like cooking but the ingredients mentioned are not there, because I don't like the look of it, because ... 


This time I put the zest of the lemon (all of it) in only half of the dough. In th rest of the dough, I put around 50 grams of chopped milk chocolate. The reason? My sister is a chocolate addict and doesn't like the taste of the tangy lemon at all. The dough is quite brioche-like, so replacing lemon with chocolate would work, I figured.


It turned out great. I ate the lemon buchteln with strawberry-rhubarb jam and that's a real recommendation!


I hope you enjoy this too!


P.S.: Any Austrian readers feeling offended for messing with their recipe: I'm really sorry! ;)